Walt Disney World has introduced a new system for skipping the lines at your favorite attractions: the Lightning Lane Multi Pass and Lightning Lane Single Pass. Understanding how to purchase and use these passes can enhance your park experience. This guide will walk you through the process and provide you with essential information to make the most of your visit.
Overview of Lightning Lane Options

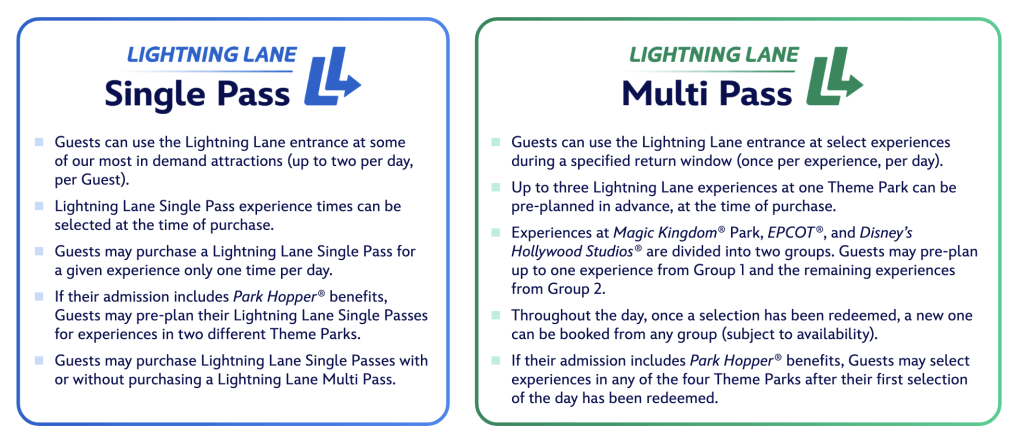
Lightning Lane Multi Pass
The Lightning Lane Multi Pass allows you to pre-select up to three attractions in a single theme park before your visit. On the day of your visit, you can check the My Disney Experience app to make additional selections once you’ve used your initial picks.
Lightning Lane Single Pass
The Lightning Lane Single Pass lets you reserve a time for one of the most popular attractions. This can now be scheduled in advance, giving you more flexibility in planning your day.
When Can You Purchase?
- Disney Resort Hotel Guests: Reserve Lightning Lane passes up to seven days before your stay, for a maximum of 14 days.
- All Other Guests: Book up to three days in advance.
- Purchasing Starts: At 7:00 AM Eastern Time on the day you are eligible.
These advance booking windows allow you to secure key rides and experiences after organizing your dining reservations and other plans.
Purchasing Process

Step 1: Update the My Disney Experience App
Ensure you have the latest version of the My Disney Experience app downloaded and running on your smartphone.
Step 2: Open the App
Upon opening the app, you’ll see the option to purchase your Lightning Lane Multi Pass or Single Pass prominently displayed on the home screen.
How to Purchase a Lightning Lane Multi Pass
- Tap the Purchase Button: Located on the Home Screen of the app.
- Select the Date: Choose the date for which you want to purchase the pass.
- Choose Your Park: Select the park where you will use your three included attractions. If you have a Park Hopper, you can choose Lightning Lanes from different parks after your initial selections.
- View Pricing: Prices vary by park and date. For example, Magic Kingdom Park may cost $29 per guest for the Multi Pass.
- Confirm Guests: Verify the guests you are purchasing the pass for.
- Select Rides: Choose one high-demand attraction and two lower-tier attractions. You can see the full list of attractions for each tier by reading our article here: A Guide to Walt Disney World Lightning Lane Multi-Pass Attractions Tiers
- Finalize Selections: The app holds your selections for up to five minutes. Modify times if needed.
- Proceed with Payment: Complete the payment process to finalize your purchase.
How to Purchase a Lightning Lane Single Pass
- Select the Date: Choose the date for the Single Pass.
- Choose Your Park: Select the park and view available Single Pass attractions.
- View Pricing: Prices vary by attraction. For example, TRON might be $20 per guest.
- Finalize Selection: The app holds your selection for up to five minutes. Modify the time if needed.
- Proceed with Payment: Complete the payment process.
Managing Your Selections
After purchasing, your selections will appear within the “My Day” tab of the My Disney Experience app or on the homepage. This hub allows you to make additional Multi Pass selections throughout your day at Walt Disney World.
Conclusion
By understanding the new Lightning Lane system and following these steps, you can enhance your Walt Disney World experience. Taking advantage of these passes allows you to spend less time in lines and more time enjoying the magic of Disney. Whether you’re a first-time visitor or a seasoned Disney enthusiast, these tips will help you navigate the parks more efficiently. Enjoy your visit!


